Connecting to TripSit: Difference between revisions
(Added a guide on connecting to the TripSit Network using popular Desktop Clients) |
No edit summary |
||
| Line 1: | Line 1: | ||
= Connecting to TripSit using a Desktop/Laptop Client = | = Connecting to TripSit using a Desktop/Laptop Client = | ||
| Line 149: | Line 151: | ||
Guides for Mobile Clients and other popular Desktop clients will be added shortly! | Guides for Mobile Clients and other popular Desktop clients will be added shortly! | ||
Note:! This page has been declared orphaned by it's author and until adopted the information given here must be crosschecked for being out-of-date or inaccurate! | |||
Latest revision as of 19:44, 5 December 2021
Connecting to TripSit using a Desktop/Laptop Client
This depends on the operating system you are running:
macOS
Windows
You might want to select the Windows 7 version while downloading the Windows 10 redirects you to the Windows store
Linux
Textual
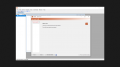
- To get started, create a new connection in Textual: Navigate to the main menu in the top left corner of the screen, open the Server menu, then click the item labeled Add Server… when the menu appears.

- Each number in the image above indicate where you will place the information that has been collected.
- Name the Network/Server as Tripsit
- Field #1: Enter the domain name i.e newirc.tripsit.me
- Field #2: Enter the network port i.e. 6697
- Field #3: Enable the Connect Securely checkbox
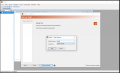
- With the Add Server… window still open, click the Identity tab on the left side navigation list.
- A window will appear that is visually similar to the following:

- In the field labeled Nickname is where you will enter your registered or choice of nick.
- Choose some alternative nicks.
- In the field labeled Username is where you will enter your registered or choice of nick.
- Enter your registered Password or leave it empty.
- Click on Save and Connect to TripSit
Hexchat
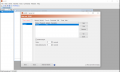
- Reaching the Network details form
- If you open up Hexchat for the first time it will display a list of networks.
- If you cant find this press Ctrl+S to pull up the Network List. Note: Please press enter after entering details in the text field to save said changes or they revert to their defaults.
- Click on Add
- Enter the name as TripSit and mark it as favourite so that it is easy to find.
- Click on Edit while TripSit network is selected.
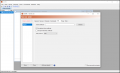
Filling the network details for TripSit.
- Enter the following details.
- Text:
- Servers: newirc.tripsit.me/6697
- Check the boxes for:
- Use SSL.
- Accept invalid SSL.
- Enter Nick and Fallback Nicks.
- If you have registered please use SASL to authenticate.
- Ensure the “User name:” field contains the name(nick) that was registered.
- Enter the password used during registration.
Now optionally you can click on the tab which says Autojoin Channels and add some channels by default like:
- #drugs
- #lounge
- #sanctuary
- #tripsit
Remember to hit Return (Enter) to register the changes you have made'
Once you have filled up the fields, please click “Close” and after having highlighted/selected the “TripSit” network click on connect.
- Image Reference

irssi
pass the following commands: replace contents with <> with whats applicable to you.
/NETWORK ADD -sasl_username <registerednick> -sasl_password <password> -sasl_mechanism PLAIN tripsit
/SERVER ADD -network tripsit -tls newirc.tripsit.me 6697
Note: Adding channels to Autojoin seems to be a bit of a task with IRSSI"
/CHANNEL add -auto #drugs tripsit
/CHANNEL add -auto #lounge tripsit
/CHANNEL add -auto #tripsit tripsit
/save
/CONNECT tripsit
weechat
Pass the following commands: replace contents having a <> with whats applicable to you.
/server add tripsit newirc.tripsit.me/6697 -ssl
/set irc.server.tripsit.ssl_verify off
/set irc.server.tripsit.sasl_username <registeredname>
/set irc.server.tripsit.sasl_password <passwordhere>
/set irc.server.tripsit.ssl_dhkey_size 1024 (dont ask >_>)
/set irc.server.tripsit.realname <realname>
/set irc.server.tripsit.autojoin "#drugs,#lounge,#tripsit" (etc)
/save
/connect tripsit
AdiIRC
Go to Server List
It can be opened by pressing the CTRL + S hotkey, by typing /serverlist or by opening Server -> Serverlist in the Menubar.
Please refer to the following screenshots as a reference:
-
Network/Server List
-
Add a Network
-

User Details
-

Network/Server Details
-
Optional Channel Autojoin configuration
-
Save and Connect


Click on Save and then Connect
Guides for Mobile Clients and other popular Desktop clients will be added shortly!
Note:! This page has been declared orphaned by it's author and until adopted the information given here must be crosschecked for being out-of-date or inaccurate!